Tinseltown Calendar & Free 2012 Calendar Download!

I'm now on the last few days of my deadline and I'm at the 'hair tearing out' stage, it's all coming together nicely though and I'm so excited to share these with you all. It's a scary leap from craft CD's and stamps into paper and all the bits that go with it but I'm really pleased with how it's looking and I hope you will all love it too. I will be starting sneak peeks just as soon as I'm allowed! :o)

Today I'm sharing a calendar I made with my Tinseltown CD...
 Supply List - Tinseltown CD, Twine - The Twinery, Gems, Double Sided Tape

Everything used is on the CD, I just added some gems and twine. If you have other papers you'd like to use to make one you can download a free black and white calendar sheet here or get  a digi kit of them in all their pretty colours here.

I printed everything onto Rymans coated cardstock (its the same one I use for promarker colouring and is like a thin cardstock so perfect weight for this kind of project - too thick and you will get horrible creases, too thin and it won't hold the weight of the calendar pad and buckle in) I folded the A4 sheet into 3 with a little lip at the bottom (this will be very easy of you have a scoring board or if like me you don't, then measure 3 equal pieces with an extra 1 - 1.5cms at the bottom and trim to size scoring with an embossing tool or bone folder) and folded into a triangle shape - you can see from this side view how its fixed together with double sided tape.
I coloured the digi stamp with Promarkers and added some stickles in icicle to the furry parts of his outfit. I used the pre-coloured version of the sleigh digi stamp, but the black and white one is on the CD also. I then cut out the scalloped ribbon and added to the top fold with double sided tape. The bow is from the cd, I used a glue dot to attach it by the centre rather than stick the whole thing flat. I then attached the digis using 2 thicknesses of 3D foam so the little boy is slightly in front of the sleigh.
I cut out the calendar cards and punched holes in the top corners - I then punched two holes in the calendar and threaded twine through and tied in a bow to hold them securely (the pages can be easily torn off at the end of each month as there is no glue holding them down) as a finishing touch I added some gems to the top corner.
This is such a quick project but makes a great gift or project for your desk or craft table (which is where mine will be going for the new year!)

If you would like to make this you can download a free Black and White Calendar by clicking here or on the picture below (and right click to save) or you can buy a digi kit of calendars in all their pretty colours here (of course if you have the Tinseltown CD already you already have everything you need to make this!)


Thank you for dropping by, I'll be back in a day or so when my deadline has passed and I'm less crazed (I'm only panicking slightly! lol)

Sarah x

A Gorjuss Wintery Birthday Card

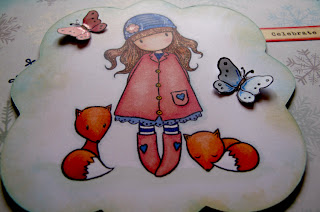
Yesterday was my MIL's Birthday and I wanted to make her a cute card as I wasn't able to see her in person due to my crazy schedule! I recently got hold of these Gorjuss girl stamps and I just knew she would love them so out came the Promarkers!...
 
 Supply List - Background papers - Echo Park, Stamped Image - Gorjuss, Promarkers - Letraset, Glitter Star & Gem - Paper Cellar, Wink of Stella Pens - Kuretake, Sticker - October Afternoon, Distress Inks, Blending Tool, 3D foam, Glue dots, double sided tape, Shaped Bleedproof cardstock cut with Cricut Expression

Here are some close ups of the colouring and the 3D butterflies (these are from the same stamp set I just secured the middle only with a glue dot so the wings could 'flap' The shaped piece of card I stamped onto was cut using my Cricut Expression, these shapes come on the built in cartridge and are great for stamped images, I've cut a ton of them out of my Promarker paper (I use Rymans coated cardstock) while I've been working this week!
  
Here you can see the subtle shimmer from the Wink of Stella pens, I really love these pens for adding highlights to my colouring, you can use them over promarkers and colouring pencils to add highlights.
I love the paper ribbon detail and I'm loving the glitter stars, I think they are on nearly every single project I've made this past week!

I hope she had a lovely birthday (B did pop round earlier and give her her pressies!) I'll have to ring her tomorrow (see if there is any birthday cake left ;o) hahaha)


Today I have been to London, and I'm still working like a crazy person on my deadlines, it's so exciting to see it all come together! I can't wait to start with the sneak peeks :o) Coffee and chocolate is seeing me through nicely, only now I've eaten the Christmas Matchmakers and the replacement Christmas Matchmakers (ooops!) I'll have to get B to hide the replacement replacement Matchmakers... it's not my fault, they're too delish!

Sarah x

Tips for Selling Your Handmade Cards & Gifts


I featured these tips on my Facebook page a few months ago and it proved to be very popular, I got a ton of feedback and lots of 'thank you's' for anyone that missed it the first time round or isn't a follower of my Facebook page, I'm sharing it again today, I hope you find this helpful!
 *******


Here are some tips for those of you who like to sell your creations, I get asked about this a LOT so I hope you find them helpful!

1. Take a close look at your work and be honest with yourself, is it of sellable quality? Just because your mum, husband or dog like it doesn't mean it is, they are biased remember! Compare your work to others, not to copy or for style, everyone is different, but for quality - would your cards sit proudly next to those you see in shops and magazines or would you feel they don't measure up. This doesn't mean you can't ever sell your cards, just that you aren't ready yet - make a note of what you need to improve on!

2. Check your work for quality and finish, are your edges straight and neat? is there any visible adhesive? Are your edges ragged? Do you have smudges? Would it survive the post? Is your card blank of good quality to stand up on a shelf? Ensure your work is of retail quality.

3. Package them well, think about how cards are packaged in card shops, pick good quality (doesn't mean expensive!) bags, add a sticker or small stamp to the back with your details (think repeat sales!) if your card has an insert print the wording on a piece of blank paper and include that in the back of the bag facing out so people know what they are buying.

4. Think about your avenues to sell them, pick around a dozen of your best cards, take them to local gift shops, boutiques and independent florists and ask to show them to the manager - pick a quiet time of day to do this, they won't have time to speak to you on a Saturday afternoon!

5. Let your friends and family know you want to sell your cards, often they would love to buy from you but don't want to ask in case they are being a burden, also they might know someone else who would love to - spread the word!

6. Think about all the day to day opportunities for selling your cards, can you take them to work? your child's school? a social group or club you go to? You could even organise a card party, set your cards out on a table, ask your friends to bring a friend and lay on a few drinks and snacks, and of course your business cards (you can get free ones from Vistaprint!) a great way to network!

7. Think about repeat business. If someone asks you to make their mum / sister / cousin a birthday card, make a note of the date, the following year you can give them a reminder a week or two before and hopefully secure another order. If you offer this 'reminder' service to busy people they may buy all their cards from you to ensure they never miss an event!

8. VALUE your work. Handmade cards are not the cheap option, a lot of time, love and thought goes into your work, anyone can walk into a card shop and pick one up off the shelf - if you don't value your work noone else will. When you talk about your work focus on the handmade, personalised and special effort that goes into your cards - they are a luxury item and should be valued as such!

9. Set up a website or a blog, this won't be of any help if you don't publicise it however! Direct people to your website or blog, show your work on there to the best advantage (you can have the best card in the world but if your pictures are dark and blurry noone will know!) use this as your online portfolio, add the address to your stamp, business cards, facebook page and anything else you can think of! Used properly this will be a great tool - you don't need to spend a lot of money (blogs are free to set up!), have web building experience or sell your cards online, as long as it looks bright and not cluttered, shows your cards off well and has a clear way to contact you. If you have testimonials from satisfied customers use these on your website!

10. Ask people what they want, if you can personalise something to people's needs they will love it, adding someones name, nickname age or favourite colour to a card can win people over! It also means if they know someone with an unusual hobby or interest you will be the first person they think of!

I hope these tips have been helpful. If you have any questions please ask and I will do my very best to answer them! Look out for my next 'tips' facebook note and blog post soon, if there are any topics you'd like me to feature just let me know and I'll do my best! :o)

Sarah x

Basically Bare Cards

Today I'm sharing the two cards I've made for Basically Bare this week...


Supply List – Chipboard Heart & Wings – Basically Bare, Felt Frame – Basically Bare, Pearl & Snowcap Paint Dabbers, Glossy Accents – Ranger, Basics Paper – Basic Grey, Tinsel Ribbon – MME, Seam Binding – Crafty Ribbons, Glitter Star – Paper Cellar, Rub-on, Corner Rounder Punch, Double Sided Tape and Extra Strong Tape from stash.


Supply List – Felt Bird Stackabellies and Canvas Banner – Basically Bare, Rubber Stamp – LOTV, Papers, Postcard Embellishment & Greeting – Tinseltown Craft CD by Sarah Hurley, Tea Dye Distress Ink, Icicle Stickles – Ranger, Cricut Expression with Built in Cartridge – Provocraft, Promarkers & Flexmarkers – Letraset, Black Memento Ink Pad, Card Blank, Double Sided Tape, Bleedproof paper & Adhesive Pearl from Stash

For more details and lots more pictures and close-ups please pop over to the Basically Bare blog and take a look!

Sarah x

Lights, Camera, Action! (ish...)

Today I'm sharing a little video preview I made of my new 'Tinseltown' CD. Because of the discussions with Craftime and getting everything moved over and other projects which came up, my Christmas CD was a little late this year and we haven't had time to sort out an actual show of it like my previous one, although I have tried to make it up to you with lots of sneak peeks and projects from me and my lovely Design Team (you can see the previews in this post here) but I thought it would be nice to make a little video so you can see how much is really on the CD.

It's not HD or anything, I just filmed it at my desk on my little Canon G11 (I missed the fancy camera crew! lol) and I probably waffle too much with no presenter to keep me in check! but hopefully it will inspire you and show you more of what is on the CD than I could possibly show in sneak peeks and projects (there is a lot on there!)


Today we also have more inspiration for you from Melly and Claire (you can also see all of the past projects in one place on my Facebook page if you don't want to scroll through my previous posts)

Thanks so much for looking and all of the lovely comments received so far, I can't wait to see your Tinseltown projects!

Sarah x

Sharing my Secrets! - My Illustration & Design Process


One of my favourite things to read on blogs is a little 'behind the scenes' peek, whether it's someones desk / studio or their work process. So today, I am sharing my, up til now completely secret, illustration process using a couple of my 'Oz' characters to demonstrate, these illustrations were used for my 'Oz' craft CD launched earlier this year...

I have a ton of notebooks and journals and each one I do something different in, one is for sketching for illustration, one is for sketching for craft designs, one is for sketching for future craft projects, one is for blog projects, one is for brainstorming etc etc... I probably have about a dozen in progress at any one time and these are all kept on my desk so I can get to them at any time. So from my brainstorming for product ideas, I decided to go ahead with the Oz craft CD, it was something I loved and knew would be popular. I then select a colour palette, I usually do this in illustrator just using trial and error until I'm happy with the combination...
Once I'm happy with the colours I then start sketching the characters and ideas for papers, embellishments etc... (I always start with the characters or digi stamps though, they really set the scene for everything else) 99% of my sketches are done with pencils / pens in my sketch book, I very rarely start anything digitally. Here are my first pencil roughs for the Lion and the Tin Man...

 
Once I'm happy with the overall look of the sketches I scan them into my computer, usually using illustrator to redraw the images (I like them to be a vector image so I can resize them for digi's / paper etc...) Here are the black and white outlines of the lion and the tin man once I had redrawn them... 
Once the characters are all drawn out in black and white I start to add colour (keeping a black and white copy as a back up for later changes, and for the black and white digi stamps that you like to colour in! Depending on the look I want for them and the project i'm working on, I use photoshop or illustrator for this or sometimes I print out the black and white version and colour using promarkers, paint or  coloured pencils and then scan back in for any retouching or adjustments.
Here is the complete 'Oz' line up once I had finished...
 
So there you have it, my process - summed up of course, this process from the starting sketches to the finished CD took around a month of almost full time work (fitting in other illustration and writing jobs around it) so much work goes into every project but CD's in particular have so much on them that they take a LONG time, hours and hours of work, I think Oz was around 150 hours of work in total, I'm constantly adding and thinking of new things as I work on it and often the thing that stops me and decides it is finished is that there wouldn't be enough room on the CD! LOL

Right now with all the things I'm working on for my craft range as well as the other illustration projects I have going on, I am literally buried in sketchbooks, pieces of papers, sketches, notes, schedules, briefs (the illustration kind, not the undie kind!), revisions, scans, prints, reference materials, colour swatches etc... It's a fun process though, I love it!

I'd love to see your design or illustration process if you'd like to leave me your link in the comments :o)

Sarah x

More Scrapping

Today I'm sharing another scrapbook LO, I'm doing very well on my scrapbooking the last week or so!...
 
 Supply List: Times & Season's Paper & Sticker - Echo Park, Kraft Cardstock - Bazzill Basics, Stickers, Journaling Card & Paper Scraps - October Afternoon, Mini Paper Clip - Tim Holtz, Tissue Paper Flower - Jolee's, Ribbon - ATDML

This one is using the new Echo Park 'Times and Season's' line along with a few bits of October Afternoon. Here are a few close ups...
Hope you all have a lovely weekend, this weekend I'm working on some illustration projects and finalising more designs for my craft range. I'll also be spending some time in my studio crafting (while watching Lost - I've just started watching this, proper scary stuff!) working on some magazine projects and making some more projects to share with you next week, I may even get started on my Christmas cards (you never know!)

Sarah x

A Tinseltown Christmas Scrapbook LO

Today I'm sharing a scrapbook layout made with my new Tinseltown Christmas CD. A lot of my scrapbooking friends have said to me that they probably wouldn't buy a craft CD as they use 12x12 papers and unless you have a super fancy printer you can't print the sheets off at the right size. So, to prove that CD's can be used for scrapbooking I have made a Layout using my new CD...

Supply List - Tinseltown CD, Kraft Cardstock - Papermania, Felt Thickers - American Crafts

The pic is me and my little sisters messing around last Christmas, hiding in with the wrapping paper to see if my dad would throw us out :o)

I very rarely use a whole sheet of patterned paper anyway, I usually always use a plain Bazzill or cardstock base and use bits of my patterned paper so the A4 sheets were perfect for that (if you do use a whole sheet of patterned paper you could always try these in a mini book or as 6x6 papers). Of course the CD also contains a ton of embellishments and journaling cards etc... that are perfect for scrapbooking, as you can see I've barely added any extras here, almost everything is from the CD. Here are a couple of close ups...
You can also see lots of fantastic scrapbook pages made with the CD over on Claire's blog. And we have some more lovely Tinseltown inspiration today from Jaine and Claire, please pop over and take a look!

I'd love to see your Tinseltown projects (scrapbooking or otherwise!) you can leave me your links here or share them over on my Facebook page :o)

Sarah x

A Basically Bare Christmas LO

Today I'm sharing a recent Scrapbook Layout I made for Basically Bare using fun Doodlebug Christmas Papers...

 Supply List – Chipboad Frame, Chipboard Pennant & Felt Banner – Basically Bare, Papers, Red & White Alphabet Stickers, Rudolph & Star Stickers – Doodlebug, Teal Alphabet Stickers – Cosmo Cricket, Holly Leaves – Paper Cellar, Gems, Red Acrylic Paint

I'm wondering if my sister will kill me when she sees this... LOL. You can see all of the details and some close ups over on the Basically Bare blog.

Sarah x

A Felt Character Tinseltown Card

Firstly, a big thank you for all the lovely comments on the Felt Owl templates - I'm so glad you liked them and I can't wait to see your creations!

After I had finished making them (and another project I will be sharing soon!) I had a ton of felt scraps left over, not big enough for another stitching project but still too big to just throw away so I started thinking of how I could use them... I was making some projects from my Tinseltown CD and had lots of digis printed off, some I had enlarged and I thought maybe I could use them as a template to make a soft touch felt card, and here it is!...
Supply List - Tinseltown CD, Felt Scraps, Glitter Markers, Black Fineliner Pen, Repositionable Adhesive, Fabric Glue, Extra Strong Red Tape, Felt Snowflakes, Stickles

Firstly I took the enlarged digi stamps (they have to be quite big or the parts are too tricky to cut out) using some repositionable adhesive I attached the whole image to a piece of felt in the main colour i.e. for the boy I used dark green. The I cut the main features out of the digi and used them as a template in the same way on my scraps of felt.

Using repositionable adhesive really is a must as the felt moves and stretches around if you try to just hold it together while you cut. You could also draw round if you want to and make sure any pen marks are hidden underneath.Don't try to cut out the really small parts, i.e. the eyes etc... the mittens are the smallest piece I could easily cut!

I then layered the pieces together with fabric glue adding details with a black fineliner pen and glitter markers. The backing paper and greeting are also from the CD - I matted these onto a card blank and then positioned the pieces where I wanted them. Once I decided on my layout I stuck them in place using the really strong red tape - worked a treat! I then added some felt snowflakes and stickles to highlight the snow, trees and snowflakes and make the whole thing sparkle! (I only really glitter at Christmas! lol)
Here are a couple of close-ups so you can see what a fab dimensional card it gives you (yet I was still able to get the card into its envelope quite easily!) perfect for someone special :o)

If you'd like to see more Tinseltown peeks and projects you can see them in this post here or on my Facebook page. We also have some more DT inspiration for you today with fab projects from Clare, Melly, Elaine and Claire.

Today I have been hard at work on more product designs and some sketches for an upcoming illustration project, somewhere in the middle I also managed to finish all of my Christmas shopping (all done online this year, much easier!) so proud of myself, this is the earliest I've ever started let alone finished! but I know with all my deadlines in the run up to the festive season that I wouldn't have got it done otherwise, now I just need to get started on making my cards, hmmm.... lol

Sarah x

Free Fabric Owl Template!


Today I have a free project download for you, I designed these cute little felt owls and made them up and thought perhaps you all might like them too!

For the Brown Owl, I made him all in felt and added some rough stitching to the belly with embroidery thread to make him look fluffy. For the grey girl owl I added some eyelashes and eyelids made of scraps of leftover felt and the belly is a scrap of Cosmo Cricket fabric (love this fabric!) You can of course add more details and more adventurous fabrics if you are more advanced than me! You could also use them as paper piecing templates to make them from your scraps of paper and then pop them onto your cards / scrapbook pages etc...

I have to say, I'm really not a great sewer so if I can do it, anyone can! (I of course also had to endure B asking me 'owl you doing'  250 times while I was making them and then cracking up laughing thinking he was hilarious *sigh* )

You can click here to download the template which also includes basic instructions. You can share your finished creations over on my Facebook page if you'd like, I'd love to see them!

If you are looking for the Tinseltown sneak peeks you can see them in this post here, or for my Christmas Village please scroll down to the previous post. Today's Tinseltown inspiration comes from JessEmma, Claire, Melly and Nikki - lots and lots to see today!

We also have a brand new Challenge on over on the Challenge Blog and it's had a bit of a make-over! I hope you'll come and join us :o)

Sarah x

Tinseltown Christmas Village

Today I'm sharing one of my own projects using the new Tinseltown CD - A Christmas Village...
Supply List - Tinseltown CD, Stickles (Icicle), Thin Card, White Felt, Soft Toy Stuffing

All of the templates and pieces are on the CD, you just need to print onto thin card and cut them out - I left little tabs at the bottom of the people and trees so I could stand them up (you can cover these up with some Angel Hair or soft toy stuffing (which is what I've used here) Here is a close up of how I done them... (you can click to make the pictures bigger)
The house templates (there are 8 precoloured ones on the CD to choose from or you could use one as a template on your own papers) I printed onto thin card and then put them together using double sided tape. I added a 'snowy' effect using stickles on the roof. When I was setting it up I thought I should have printed off one of the little wreaths on there and put it on the front door - I will add that in later! :o)
Once the stickles were dry (tested lots of times by putting my finger into wet stickles and then repairing the damage I'd done *sigh*) I set the whole scene up onto a piece of white felt and added some soft toy stuffing to hide the little tabs at the bottom of the little bits - I added some stickles to the trees as well and closer to the day I might add some loose glitter over the felt / stuffing to make it sparkle. I printed one of the patterned papers off from the CD and stood it behind the whole scene to pull it all together and make it stand out against my white walls.
 
Now I just need to run some lights in front of it and I've got a cute little winter snow scene for my mantlepiece! The whole thing took me just over an hour to put together including printing and sticking and styling the scene so not bad for a home decor project! You could also use the digi stamps and colour them in to match the people in your family - I should have given my little girl red hair like me! :o)

You can get your copy of Tinseltown here thank you to those who have already ordered, I'm hearing it's very popular! I'd love to see pictures of your Christmas Villages if you make one.

Sarah x

October Round-Up!

I haven't done a round-up post since August so I thought I'd catch you all up with the comings and goings of the last 2 months in pictures :o)

I gave my blog and website a complete makeover (with lots more to come!)... I started scrapbooking in Autumn colours and painted my nails in the same tones - loving this time of year!
 
I have also started designing products for next year for some other companies, as well as my own range, I can't say who yet but I'm super excited and will tell you as soon as I can! I went to Selfridges with Emma (again!) and treated myself to this tiny box of treats... and started trying to cook more (with varying degrees of success)
   
Once again, I spent much of the month designing, mostly working on new products for my craft launch and also some illustration work, some Christmas Cards and my new Christmas CD which was launched last week
And now I'm working on lots of projects for my blog this month, I think you're going to love them! and of course all of the product designs - I have exactly one month left now and approximately 1,279,343,675 things left to do - eeeeeeek! I'm so lucky to have my lovely Design Team who hold the fort during this busy time!

Today's Tinseltown inspiration comes from Jaine, who has made up the Christmas Journal project - everything you need for this is on the CD - just add your own ribbons, glitter etc! There are tons of different ways you could use all of the elements but I just love the way Jaine has done it, better than I ever imagined it! and Elaine who has a gorgeous card to share, I just love how she's put this together, so cute!

Sarah x